Friday, April 22, 2011

Earrings Galore!

I've been trying my hand at quilling earrings lately and have had a lot of fun doing it!

Paper earrings though???  You wouldn't think those would hold up very well or for very long would you?

Well I found that if you spray them with a sealant and also mod podge them they become more sturdy and wearable.  You want to do one side at a time though.  Let it dry, them flip them over and do the other side.  This goes for the spraying of the sealant as well as the mod podging.

Here are a few of my favorites that I have done. 


And here is a set that I made custom for a friend.  She liked the orange and yellow ones but wanted black and silver.


Until next time,
B

Tuesday, April 19, 2011

Handmade Bethy has business cards!

Just wanted to share with you my business cards that came in the mail today!  I'm very happy with the way they turned out.


I got these done at VistaPrint.com.  I've done other things with them in the past, but this is the first for business cards.

I also designed and purchased my logo through them.  


Let me know your thoughts!

Until next time, 
B

Saturday, April 16, 2011

Attention Fellow Crafters!!!

I was recently given a gift that will definitely last me a lifetime and prove to be a handy guide in my pursuit of starting my own craft based business.

My brother gave me the book "The Handmade Marketplace" by Kari Chapin.  And it has already become a great resource for me!  Had he not had surgery, and had I not had to take care of him, I may have never come across this book!  :-)  Well maybe I would have eventually, but I definitely owe my brother a big thank you for this book.


It's a step by step guide of getting your craft business off the ground.  Amazing detail and she doesn't leave anything out.  I think the part of this book that I like the most is that she has input from about 20 people who are in the crafting business.  So you get real advise from people who are actually doing it.  She also has experts on marketing and accounting giving their 2 cents.

So I HIGHLY RECOMMEND this book if you are struggling or just starting out.

Until next time,
B

Thursday, April 7, 2011

Bacon Cinnamon Rolls

I stumbled across this recipe on another blog and I had to share it.  A great combination of salty and sweet flavors.  And an easy breakfast to make!

All you need is a tube of Pillsbury Cinnamon Rolls from the refrigerator section of your grocery store and some bacon!

Fry up the bacon, but don't cook it all the way.  You don't want it crispy, otherwise you won't be able to roll it up with the cinnamon rolls.  After you cook up the bacon, put it on a plate with paper towels to cool and soak up the grease.

Next, take some parchment paper and unroll the cinnamon rolls.  I used 2 bacon strips per roll.  Lay them on top of the cinnamon roll and roll them back up.  Once you have bacon'd up your rolls place them in a pan and bake according to the directions on the package of rolls.

Take out of oven, frost, and enjoy!!

Oink!

Unfrosted

Bacon Close-up

Frosted Piggyness

Close-up of frosted bacon....Oink!

Nom nom nom!!!

Was definitely worth the extra calories!

Until next time,
B

Tuesday, March 15, 2011

Felt Babies!!

I've been playing around with different mediums recently and have discovered that I love felt!  Who would have thought!  Anyways, the first creations I made with felt were rolled felt flowers.  I made them into magnets and keychains.  You wouldn't think a felt keychain would hold up, but it is surprisingly very durable and strong!

Here are the magnets I made.


And some of the keychains...


Next I went on to making something a little more complex.  I call these my felt babies.  They take a lot of patience to make and a lot of time.  I think I can make 2 in about 4 hours.  I don't know if that's good or not....maybe I am just slow with felt!

Owl


Bird


Wiener Dog


Penguin


All the felt babies standing in a row!


I think next I will make some type of felt hair accessory.  I bought the pins for it, just need to figure out how I'm gonna do it now!

Update on the Etsy shop:  It is going S....L....O....W!  Like I said, I anticipated this, but man is it frustrating.  16 products listed and nothing purchased yet.  However I do have many page views and people have "favorited" some of my items.  So at least I know people are looking.  Just wish I could get them to BUY!

Until next time,
B


Monday, March 7, 2011

Introducing....Handmade Bethy!!

Recently I started an Etsy shop and I am trying to spread the word!  So far it's been kind of a slow start, but I sort of expected that.  But I'm gonna push forward and stick with it.  This is something I REALLY want to do and want to be successful at!

I named my store Handmade Bethy (no explanation needed, I'm sure)  I've got about 12 items listed now and plan on added much more as I have the time to create and post.

So check it out and do some shopping!  :-)

Handmade Bethy Etsy Shop

I've also created a separate email account: handmadebethy@gmail.com


Till next time,
B

Sunday, February 13, 2011

MOMmade Party

This past Thursday my friend, Sunne, organized an amazing craft fair/show/sale event at the Coffee Hound in Bettendorf.  It was from 6-9pm on a Thursday night and the turnout was pretty good!  I think there was a total of 13 different vendors selling their homemade items or passing out information on their services, like my friend Cari who was handing out information on being a doula and the services that she provides.

The name MOMmade suggests that these are just mom's selling their goodies.....which is mostly true, except for the fact that I was there and I am not a mom.  Thankfully Sunne still let me come! :-)  I made 9 sets of coasters, several bottle cap magnets, and 6 microwave heat wraps to sell.  I was extremely nervous about selling my items.  For some reason I thought people would think what I made was stupid, or tacky, or not well made.  The feedback I got was the complete opposite and it's fueled me to continue my crafting for the next event.  The fact that my boyfriend, Ryan, came to the event and stayed the entire time was also a great help with easing my nerves!   I think Sunne plans to have the MOMmade party once a month at the Coffee Hound! 

Doing this event has inspired me to look into starting an etsy.com shop.  I haven't looked into the details on it yet, but I plan to very soon!  How great would it be to make your hobby and what you love to do into something profitable!  

Unfortunately I was too focused on manning my table that I didn't get a lot of photos, but I did get a couple of the table that Sunne and I shared.


My side of the table.


Sunne's side of the table.  She crocheted cute headbands for adults, toddlers/infants, and newborns!  They are super cute!

Can't wait for the next one!!

Until next time...
B

Saturday, January 29, 2011

My First Quilled Creation!!

I've found a new crafting medium!!  Quilling!  I remember seeing these things in my house growing up.  I'm pretty sure my mom either did them or a relative did....either way I wish I would have hung on to them!  So now I will just have to make my own!

I bought some basic supplies at Hobby Lobby.  A quilling tool and tweezers.  Glue and paper strips.  All rather inexpensive too.  I think I spent $15 total.  I really just wanted to get the basics to see if I would even like it first.  It is definitely not a quick and easy craft to do.  Takes some time and dedication on your part and steady hands.

So here is my first creation.....a cute little owl!


It's probably not the best out there but I am pretty impressed with it!  Now I will have to make him some friends!

Maybe someday I will be able to make something like these!


Till next time...
B

Thursday, January 20, 2011

Kitties need blankets too!

My cat and my brother's cat love making the top of the couches their personal napping spots and I have had to deal with the enormous amount of cat hair buildup forever....well no more!

I made both of them their own personal kitty blanket to put on their sleeping spot so that when it gets full of hair I can just throw it in the wash!

Very easy, just one of those fleece tie blankets (but kitty-sized)!

Toonces was already in love before I even started making it!


And the finished product, with kitty...


**My brother's cat not pictured.....I guess he wasn't sleepy at the time I was taking the pictures.

By the way, I wrote this blog with a cat on my lap the entire time.

Till next time...
B


Tuesday, January 18, 2011

This years Christmas gifts....FINALLY

So it's only been a little over 3 weeks since Christmas has come and gone but better late than never!  A new thing I have started doing the past couple of years is making all of my Christmas presents for the majority of my family and friends.  So here is what I did this year!

Bottle Cap Magnets!


This isn't the first time I've used this idea before, but this time I flipped the caps over and cut out images and pasted them inside.  Some pretty scrapbook paper and a little glue will go a long way! I punched them out with an inch circle punch which was the perfect size for the bottle cap.  Sadly, I am not the first to come up with this cool idea.  I came across similar magnets at Borders and another store (can't remember where though).  But I like to think mine are the best and most unique!

Here are a few more pics...


Microwave Heat Wraps!


These things are amazing and so easy to make!  If you just want a simple one and don't care what it looks like all you need is a tube sock.  To make it pretty though, I put a softer, more colorful sock on the outside and just tied the top.  This way you can remove the outer sock and machine wash it when you need to.  To make the inside, I mixed rice and cut open a couple packets of herbal tea and mixed together, then sewed the tube sock shut.  When you microwave the heat wrap it's best to place a cup of water in with it or spritz it with some water.  This way it maintains the moisture and your heat wrap will last longer!


Bathroom Tile Coasters!


This gift I am most proud of this year!  It took a while, but the result was well worth it!

I took plain white ceramic bathroom tiles (Home Depot, Lowes, etc.) and spray painted them black.  Several coats.  
Let them dry overnight. 
I then printed off images just with my printer at home and used spay adhesive to glue them to the tiles.  
Let them dry overnight.
Next, I sprayed them with a a clear glossy lacquer.  Used mainly for models.  Several coats.
Let them dry overnight.

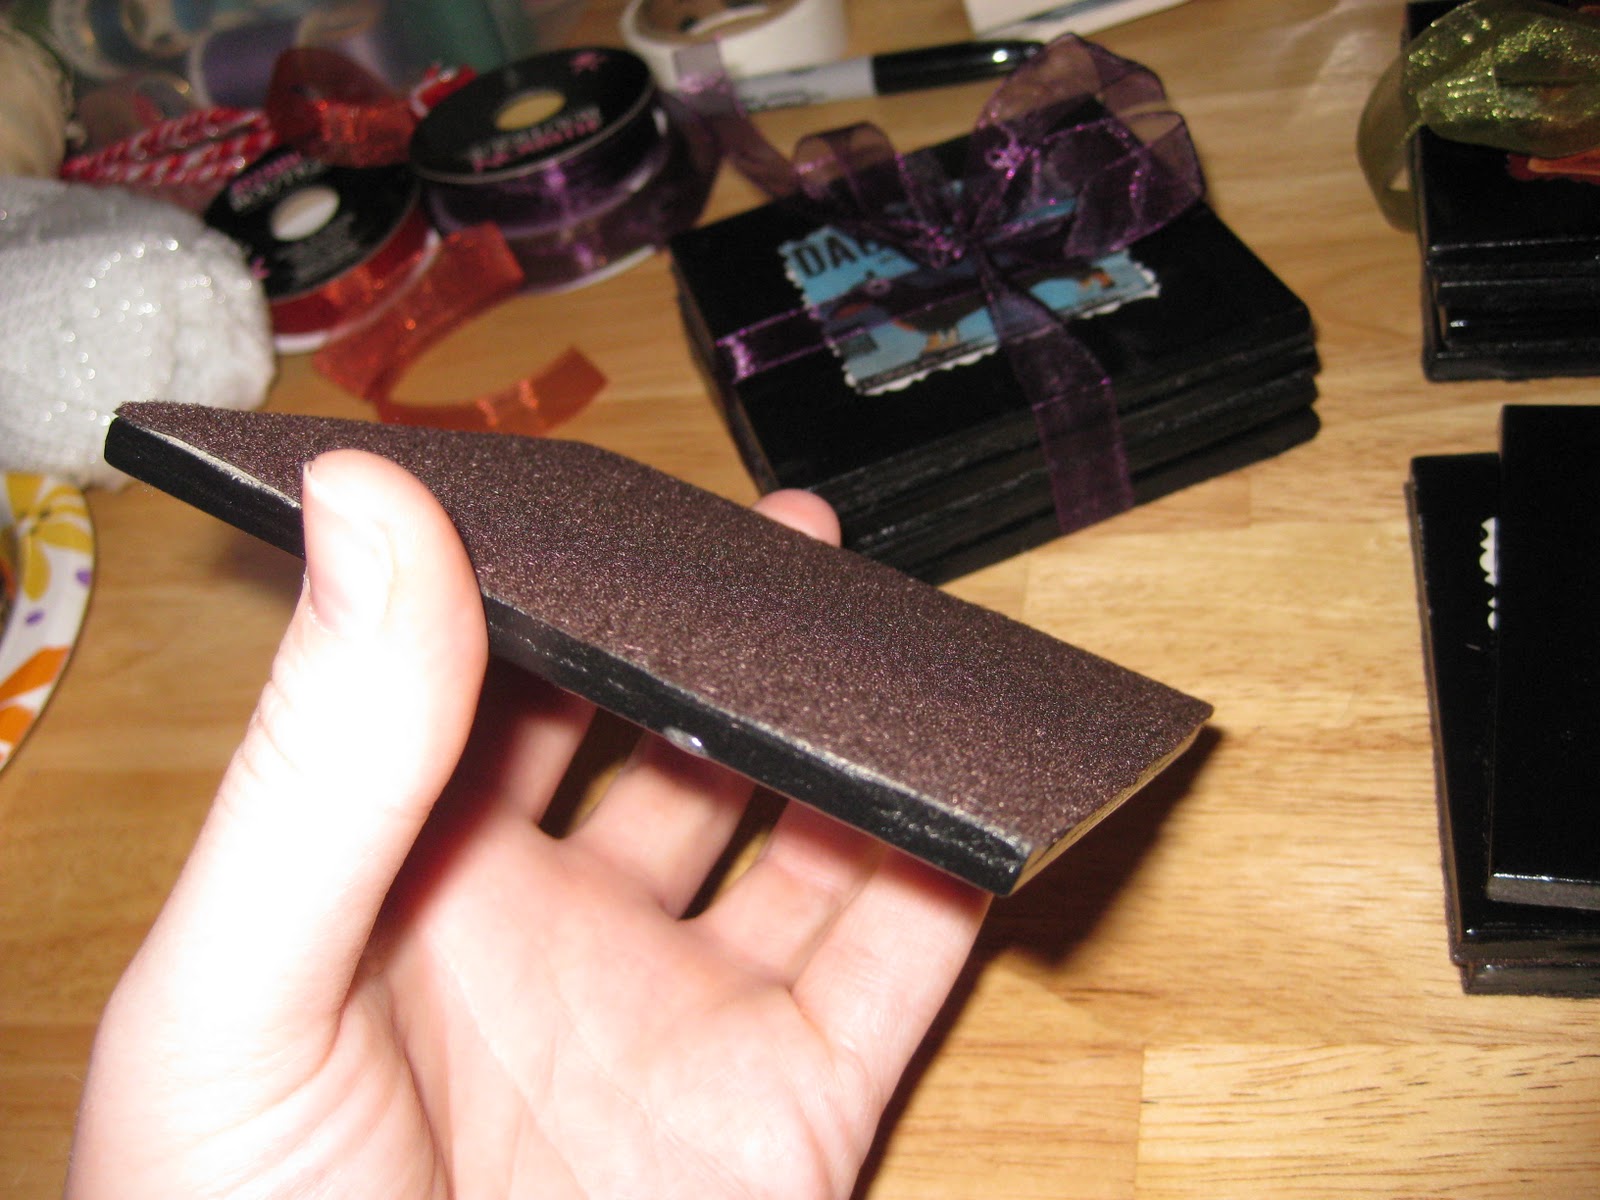
Next, I cut out adhesive felt pieces to fit the bottom of the tiles and attached them.


And that's it!
Here are some more pictures of the finished product.


They really work great!  Heavy enough not to slide around or stick to your cup and they don't absorb the moisture like the paper/cardboard ones.  I'm definitely going to be making more of these in the future!

Now it's time to start thinking about next years Christmas gifts!!

Till next time,
B